 Wavelens
Full Spectrum: the vehicle installation guide
From the box to a car that listens from 300 MHz to 5 GHz every time you turn the key. The kit arrives programmed and tested as one rig; what's left is the part only you can do: give it clean power, put each antenna where it can hear, and route the cables so nothing comes loose. Plan on an afternoon. No soldering, no software.
Overview
Full Spectrum is three radios feeding one phone screen. Each has a job and each needs to be in a different place in the car:
| Part | Hears | Where it lives | Antenna |
|---|---|---|---|
| Raspberry Pi 4 (the Scanner, main companion) | Runs everything below; talks to the phone over Bluetooth LE | Out of the sun: under a seat, in the glovebox, or behind a trim panel | None of its own |
| RTL-SDR A, the sensor dongle | Tyre sensors, key fobs, remotes, meters at 315 / 433 / 915 MHz | Inside the cabin, on a 6-inch extension from the hub | Short 433 MHz whip on a small mag base: dash, rear deck or any flat steel inside |
| RTL-SDR B, the scanner dongle | VHF, UHF, 700 and 800 MHz public-safety radio; sweeps, Listen, Follow, trunk-tracking | Wherever the roof antenna's lead comes into the cabin, on its extension | Wideband mag-mount whip on the roof, outside the metal |
| Spotter (ESP32-C5, second companion) | 2.4 and 5 GHz Wi-Fi beacons, Bluetooth LE adverts | High and forward: dash top or A-pillar, antenna against glass | Low-profile stealth antenna on its short lead |
The order of work matters. Power first, because every other problem looks like a radio problem until the Pi stops browning out. Antennas second, because an antenna inside a steel box is the difference between hearing a control channel at +38 dB and not at all. Cables and pairing last.
In the box, and what to buy
Shipped
- Raspberry Pi 4 (4 GB) in a vented case with a fan, imaged card installed: bridge, digital-voice decoder, admin page, start-on-boot and your area's local pack already on it.
- Two RTL-SDRs, roles pinned by serial and labelled A (sensors) and B (scanner), each with its antenna: a 433 MHz whip on a small mag base for A, a wideband mobile scanner whip on a roof mag mount with a 3 m SMA lead for B.
- Two 6-inch USB extension cables (data cables, one per dongle) and the SMA adapters and pigtails each antenna needs.
- Spotter in its black enclosure with its stealth antenna, and a short USB cable.
- If you added the case set ($99): a padded sleeve for each RTL-SDR and a hard carry case with cut foam for the whole rig.
Not shipped, because they depend on your car
| Part | Spec that matters | ~Price |
|---|---|---|
| 12 V to 5 V buck converter with a USB-C plug, or a USB-C PD car adapter | Rated 5 A (the Pi 4 wants 3 A with headroom). Not a "2.4 A" lighter plug; those sag under load and reset the Pi over bumps. | $12–25 |
| Powered USB 3.0 hub, 4 ports | Externally powered. For a hard-wired install, one that takes 9–36 V on a barrel jack is tidiest; otherwise one with a 5 V 3 A supply fed from a second buck converter. Never an unpowered hub. | $20–30 |
| Add-a-fuse tap (for your fuse-box blade size: ATO, mini or low-profile mini) and a 5 A fuse | To take power from an ignition-switched circuit without cutting any factory wire. | $6–10 |
| Ring terminal and 16–18 AWG wire, a couple of metres | For the ground to a chassis bolt and the run to the fuse box. | $5 |
| Cable ties, Velcro or mounting tape, a trim tool | A Pi that slides into the seat rails will eventually unplug something. | $8 |
| Two clip-on ferrite chokes (optional, for 5–7 mm cable) | For the 12 V lead and the Pi's USB-C cable if the sweep shows ignition noise. Cheap insurance; see noise. | $6 |
| Longer USB extensions if your layout needs them | Data cables, not charge-only. 1 m $8, 2 m $10, 3 m $12 at checkout, or any USB 2.0 A-to-A extension marked for data. USB can be long; coax can't. | $8–12 |
If you'd rather not touch the fuse box, a quality USB-C PD socket adapter rated 30 W or more, on a short cable, powers the Pi well enough; the hub then needs its own supply (a second socket adapter or a 12 V-input hub on a splitter). The hard-wired route is cleaner and is what the rest of this guide assumes.
Plan the layout
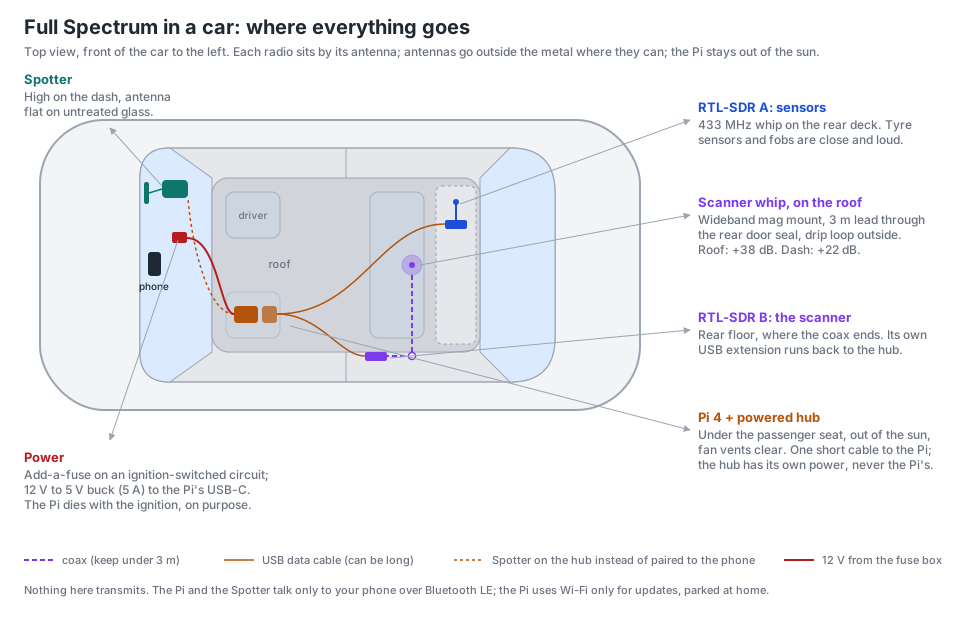
Before fixing anything down, lay it all out loose and check these:
- Coax under 3 m. The roof antenna's lead is 3 m; it loses about 1 dB per 3 m at 850 MHz, so don't extend it. Put dongle B where the lead ends and run USB from there. Rear-seat floor or parcel shelf is typical.
- Dongles apart, and away from the Pi. The two RTL-SDRs run hot and leak each other's oscillator noise when side by side; on the Pi's own ports they also block each other. Each goes on its own extension, 15 cm or more apart.
- Pi out of the sun. A black case on a dashboard reaches 70 °C in summer and the tuners drift until the decoder can't follow. Under a seat or in the glovebox stays under 55 °C.
- You can reach the SD card and the hub's ports. You'll want to add a radio later.
- Spotter where it sees out. Wi-Fi at 5 GHz doesn't like steel or tinted glass with a metallic layer; the front windscreen is usually the clearest. High on the dash, antenna flat against the glass.
- Phone within Bluetooth reach of both. Anywhere in the same car is fine; the glovebox doesn't block BLE.
Power
Everything else in this guide is undone by bad power. Symptoms are a Pi that reboots at traffic lights, the lightning bolt on the admin page, dongles that "stopped sending" in the log, and Under-voltage detected! in dmesg.
- Find an ignition-switched fuse
Open the cabin fuse box (usually driver's footwell or behind a dash end panel; the owner's manual has the map). With the key off, use a test light or multimeter on each fuse's exposed test points to find one that is dead with the key off and live in Accessory or Run. Good candidates: the 12 V socket, the radio, or a spare labelled ACC. Avoid airbag, ABS, engine-control and lighting circuits, and anything rated under 10 A.
- Fit the add-a-fuse
Pull that fuse, seat it in the add-a-fuse's lower slot so the original circuit keeps its own fuse, put a 5 A fuse in the upper slot for the Pi, and plug the tap in. Orientation matters: the tap's pigtail must be on the side of the slot that is live when the key is on. Check with the meter: pigtail dead with the key off, 12 V with it on.
- Ground
A ring terminal on the buck converter's negative lead to a bare-metal chassis bolt near the fuse box; scrape paint if you have to. A bad ground is the usual cause of a converter that measures 5 V on the bench and 4.6 V in the car.
- Converter to Pi, short cable
Run the converter's output to the Pi's USB-C over the shortest cable you can; 30 cm is ideal, 1 m is the limit. Long, thin USB-C cables drop a quarter of a volt at 3 A, and the Pi notices. If the converter has a bare 5 V output and you're making the plug, set it to 5.1 V under load.
- Power the hub from the same circuit
A 12 V-input hub goes straight to the same add-a-fuse feed and ground. A 5 V hub gets a second buck converter, not the Pi's output: the Pi 4 can source 1.2 A across all its ports in total, and two dongles plus a Spotter is more than that. The hub's power must never come from the Pi.
- Check the start-up order
Turn the key to Accessory. The hub's light should come on at the same moment or before the Pi's red LED; radios already on the bus when the Pi boots enumerate cleanly. Both on the same switched circuit does this on its own. Wait two minutes for the first boot and watch the Pi's green LED settle to occasional flickers.
Ignition-switched, on purpose
The Pi should die with the ignition. Its card survives hard power-offs; a car battery flattened by a Pi left running overnight doesn't. If you want the scanner to keep running for a while after the engine stops, put a 10 Ah USB power bank with pass-through charging between the converter and the Pi, or a UPS HAT with its power-loss shutdown script. Don't wire it to a constant-12 V fuse.
Mounting the Pi and hub
- Under the front passenger seat is the usual spot: cool, out of sight, close to the fuse box and to the rear seat where the roof lead comes in. Check the seat's full travel first; a Pi in the rail path is a Pi with no USB-C plug.
- Glovebox works for hatchbacks and small cars. Leave the fan's intake clear and don't stack the dongles in there with it.
- Fix the case and hub with Velcro or mounting tape to carpet or a trim panel, or zip-tie through the case's slots to a seat frame. The point is that nothing can slide, swing or rattle.
- Keep the fan's vents unobstructed and the Pi off the floor if your car ever gets wet inside; a cable tie to the seat frame's crossbar lifts it 5 cm.
- One short USB 3.0 cable (half a metre or less) from the hub to the Pi's blue USB 3 port. Leave the Pi's other ports empty; they're spares, not a place for dongles.
- Label the two dongles if the labels have come off: A is the sensor dongle, B the scanner. Their roles are pinned by serial so plugging them into the wrong port doesn't matter; plugging them onto the wrong antennas does.
Antennas
A car is a steel box with glass windows. An antenna inside hears through the glass in one direction; the same antenna on the roof hears 360° with the roof as its ground plane. On our bench car the 800 MHz control channels went from +22 dB on the dash to +38 dB on the roof. Everything in this section follows from that.
Scanner antenna (dongle B): on the roof
- Place the mag mount
Roof centre is best; between the rear doors or just ahead of the rear glass is a close second and keeps the lead short. Wipe the paint clean, set the base down flat. On an aluminium or composite roof a mag mount won't hold; use a rear-hatch lip mount or a trunk-lid mount instead and accept a few dB less.
- Route the lead
Through the rear door's rubber seal at the top corner, or a rear-hatch grommet. Leave a small drip loop outside so water runs off the cable rather than along it into the cabin. Don't pinch the coax in a door that closes on it hard; RG-174 is thin and a crushed section is a dead antenna. If you bought the roof antenna kit, the silicone sealant in the box goes where the lead crosses the seal.
- Connect to dongle B
SMA plug straight onto the dongle, finger-tight plus a quarter turn, never with pliers. If an adapter is needed, one adapter, not a chain. Leave the lead slack where it meets the dongle so it isn't the thing holding the dongle up.
Sensor antenna (dongle A): inside
Tyre sensors, fobs and remotes are near-field: your own wheels are two metres away and loud. The 433 MHz whip can live inside on the rear deck, a dash corner, or any flat steel the mag base will grip. Keep it half a metre or more from the Spotter and from the roof lead. If your rear deck is plastic, a steel washer under the carpet gives the magnet something to hold.
Spotter antenna: against glass, up high
The stealth antenna is flat; stick it to the windscreen's top corner or the A-pillar trim, lead down to the Spotter on the dash. Not behind the rear-view mirror's black dot pattern, not on heated or metallic-tint glass if you have a choice. A Spotter mounted low in the centre console hears noticeably less at 5 GHz.
Don't share one antenna
A tee splitter costs 3–6 dB and lets each dongle's oscillator leak into the other. Two antennas is the right answer, which is why the kit ships two.
USB wiring
Four things plug into the hub. Each has a reason to be on its own cable:
| Hub port | Device | Cable | Why |
|---|---|---|---|
| 1 | RTL-SDR A (sensors) | 6-inch extension (shipped), or longer | Sits with its whip, away from B and the Pi |
| 2 | RTL-SDR B (scanner) | 6-inch extension (shipped), or longer | Sits where the roof lead ends, so the coax stays 3 m |
| 3 | Spotter, if you run it from the Pi (see below) | Its own USB cable; 1–2 m extension to reach the dash | The Pi drives it over the cable and relays what it hears |
| 4 | Spare | — | A third RTL-SDR for aircraft, a HackRF, or a GPS puck later |
- The hub to the Pi's blue USB 3 port on the short cable. Nothing else on the Pi.
- Dress each extension so the dongle hangs free, not pressed against carpet or another dongle. A loop of Velcro tape around the cable to the seat frame keeps it from being kicked.
- Charge-only cables are the single most common "it worked on the bench" failure. Every extension in the kit is a data cable; if you buy more, check they are too.
- Leave 10 cm of slack at every plug. Cars flex; taut cables walk out of sockets.
The Spotter: two ways to run it
The Spotter is its own companion and works either way. Pick one; you can change your mind from the phone or the Pi's admin page later.
- Paired to the phone (the default and what the kit is tested as). Power it from any USB port: a car charger, the hub's spare port, a power bank. It pairs over Bluetooth as the second companion. Best when you want it to keep working with the phone outside the car, or on an iPhone or iPad.
- Plugged into the Pi's hub. No pairing: the Pi drives it over USB and passes what it hears through its single Bluetooth link to the phone. Best when the phone's Bluetooth is already busy (earbuds, watch, car) or when you add a second Spotter: one paired to the phone listening everywhere, one on the Pi parked on the busy Wi-Fi channels so a camera you pass is heard within a beacon or two.
Either way, mount the board on the dash with Velcro, status light visible, antenna lead to the glass.
First power-up and pairing
- Key to Accessory, wait two minutes
The hub lights, the Pi's red LED comes on, the green one flickers through boot. The bridge starts on its own; there is nothing to log into.
- Pair the Pi
In Wavelens: More → Companion radio → Find. The Pi appears under its radio name, Wavelens- followed by four characters (you can rename it on the admin page later). Tap Pair. It becomes the main companion: it carries the scanner audio and the sensor decoder.
- Pair the Spotter
If it's on its own power, Find again, tap it, Pair: it becomes the second companion. If it's on the Pi's hub, skip this; it shows up under the Pi's hardware line within a few seconds.
- Open the Scanner tab and tap SCAN
The first lock takes 30–90 seconds while the hunt sweeps the public-safety bands and finds your area's control channel. After that the channel is cached and lock-on is immediate on every start. You should hear dispatch traffic; if your area's system is encrypted you'll see the talkgroups and their names but hear nothing, which is correct.
- Find the admin page, once, on home Wi-Fi
The Pi joins the Wi-Fi network you gave at checkout when it's in range. Parked at home, on a phone or laptop on that network, open
http://wavelens.local:8080(or the Pi's IP from the Companion screen's hardware line) and set the admin password. That page is for updates, Wi-Fi, settings and logs; nothing on it is needed day to day. The Pi needs Wi-Fi only to update and never for scanning: on the road it talks to the phone over Bluetooth and nothing else.
Prove the install before you trust it
Ten minutes in the driveway, one radio at a time. Each check isolates one part, so a failure tells you exactly what to move.
| Check | How | Pass | If it fails |
|---|---|---|---|
| Power | Admin page → Status, after five minutes idling with everything plugged in | No under-voltage warning; temperature under 60 °C | Shorter USB-C cable, check the ground, confirm the hub isn't drawing from the Pi |
| Scanner antenna | Scanner tab → Spectrum, 851–869 MHz (or your region's public-safety band) | Control-channel lines at +25 dB or more over the band | Top line at +10: the antenna is inside the metal, the SMA is loose, or the lead is crushed. Move it to the roof and re-check |
| Sensor dongle | Drive 50 m or press the key fob near the car; watch the Alerts journal | Your own four tyre sensors appear with pressures, the fob shows as a remote | Whip not on A, or A's base not on steel. Swap the whips if in doubt |
| Spotter | Turn on your phone's hotspot, or hold a second phone with Bluetooth on at the far end of the driveway | Seen within a few seconds, signal stronger than the phone's own scan sees it | Antenna not on glass, or the board is behind the dash. Move it up |
| Three at once | HUD → Rule hits after a lap of the block | Counts credited to the phone, the Pi and the Spotter | A radio with zero hits isn't paired or isn't powered |
| Ignition cycle | Key off, wait 30 s, key on, wait two minutes | Pi reappears in the app on its own; Scanner locks within seconds | Pi on a constant-12 V fuse (it never rebooted) or the hub powered up after the Pi |
The first drive
- Phone in a dash mount with the screen on for the first trip, so you can watch what each radio adds. Screen-off scanning works afterwards.
- Expect the sub-GHz decoder to be the busiest radio in traffic: every car around you has tyre sensors. The journal groups them; what matters is the ones that ride with you.
- The Spotter will show far more Wi-Fi beacons than the phone did. That's the antenna and the lack of Android's scan throttle, not a fault.
- Follow mode on the Scanner tab holds your area's system through a drive and goes back to it after a conventional hit. If you cross into another system's area, the hunt re-locks in about a minute.
- Afterwards, HUD → Rule hits tells you how much the kit added over the phone alone. On our drives it runs several times the phone's count, mostly from the sub-GHz decoder and the parked Spotter.
Noise, heat and dropouts
| Symptom | Cause | Fix |
|---|---|---|
| Spectrum shows a comb of carriers every few hundred kHz that appears with the engine | Alternator or ignition noise on the 12 V line | Clip-on ferrite on the 12 V lead and another on the Pi's USB-C cable; ground the hub's metal shell to the chassis; move the buck converter further from the dongles |
| Pi reboots over bumps or at idle | Supply sagging, bad ground, long USB-C cable | Measure 5.0 V or more at the Pi under load; shorten the cable; re-make the ground |
A dongle vanishes; log says usb_claim_interface -6 or "stopped sending" | Hub powered from the Pi, or an unpowered hub | Give the hub its own supply; replug the dongle (it's picked up within ten seconds) |
| Scanner audio chops in and out after an hour in the sun | Tuner drift from heat | Move the dongles off the Pi and out of direct sun; the kit's TCXO dongles hold within 1 kHz when they aren't cooking |
| Scanner heard everything in the driveway, little on the road | Roof antenna slid or its lead got pinched in a door | Re-seat the base; re-route the lead through the seal's top corner with a drip loop |
| Spotter hears 2.4 GHz fine, nothing at 5 GHz | Metallic-tint or heated glass | Move the antenna to untreated glass (often a strip at the top of the windscreen) or a side quarter light |
| Hub lights, Pi dead | Add-a-fuse in backwards or wrong slot | Pigtail should be live only with the key on; swap the tap's orientation |
| Scanner audio stutters on the phone | Phone Bluetooth busy, or an old phone's small MTU | Plug the Spotter into the Pi's hub so the phone holds one link; see phones |
Anything else: the admin page's Status says what's wrong in plain words and offers the fix, and Download log for support plus an email to wavelensapp@gmail.com gets a reply with the answer.
Living with it
- Every start is automatic. Key on, two minutes, the Pi is back in the app. Key off, it's gone. There is no shutdown ritual; the card is built for it.
- Updates are free for life and arrive when the Pi is on your home Wi-Fi: overnight if you ticked that box on the admin page, or when you tap Install update. If a new version doesn't start, the Pi puts the last working one back on its own. The Spotter updates from the phone over Bluetooth, or from the Pi if it's plugged in there.
- Moving it between cars is the case set's job: unplug the hub's power and the roof lead, lift the Pi and hub, the dongles ride in their sleeves. The add-a-fuse and converter stay with the car; a second set for the other car costs less than the fuel to go and fetch the first.
- Washing the car: lift the mag mount off, or hand-wash around it. Automatic washes with brushes will take it.
- Winter and summer: the kit is rated for a parked car's range, but a Pi left idling in the sun with the engine off has no fan running and no reason to be on. Ignition-switched power handles that for you.
- Laws. Nothing in the kit transmits and the only link out is Bluetooth to your phone, but in some places receiving or decoding some signals is restricted, especially while driving. Your area's pack switches off rules that don't apply, not laws. Know yours.
Adding radios later
The rig scales by hub port. The bridge finds what's on the bus and assigns jobs; you set roles on the admin page's Settings only if you want to override it.
- A third RTL-SDR ($40, pre-configured) adds ADS-B aircraft on 1090 MHz with its own small whip; aircraft are line-of-sight and loud, so it can live inside.
- A HackRF One (about $300, not something we sell) adds a 1 MHz to 6 GHz energy sweep that reaches 5.8 GHz video links, 4.9 GHz public-safety data and cellular uplinks, labelled honestly as "something is transmitting here". It needs the hub's 900 mA port, a short shielded USB 3 cable, and a wideband 700 MHz–6 GHz antenna of its own; the 800 MHz whip tells it nothing above 1.3 GHz. Details.
- A directional Yagi ($59, when in stock) on dongle B, roof front edge pointing forward, hears a fixed plate reader or hotspot blocks sooner at the cost of the sides and rear. For a commute you drive the same way every day.
- A second Spotter ($199) on the Pi's hub, parked on the busy Wi-Fi channels while the first keeps listening everywhere.
Printable checklist
- Ignition-switched fuse found; pigtail dead with key off, 12 V with key on
- Add-a-fuse fitted, 5 A fuse, ground to bare chassis metal
- Buck converter (5 A) to Pi USB-C, cable under 1 m, 5.0 V or better at the Pi
- Powered hub on its own supply, same switched circuit, lights before the Pi
- Pi and hub fixed under seat or in glovebox; fan vents clear; seat travel checked
- Hub to Pi's blue USB 3 port, cable under 0.5 m
- Roof whip centred, lead through rear door seal with drip loop, SMA finger-tight on dongle B
- 433 whip on steel inside, on dongle A, half a metre from everything else
- Each dongle on its own extension, 15 cm apart, hanging free
- Spotter high on dash, antenna flat on untreated glass, powered
- 10 cm slack at every plug; everything tied so nothing swings
- Pi paired as main, Spotter as second (or plugged into the hub)
- Spectrum: control channels +25 dB or more
- Own tyre sensors in the journal; hotspot seen by Spotter; Rule hits from all three
- Ignition cycle: Pi back in the app on its own within two minutes
- Admin password set on home Wi-Fi; automatic updates on
Don't have the kit yet?
Full Spectrum, $499, is the Pi, two RTL-SDRs with their antennas and a Spotter, programmed, set up for your area and tested together before it ships. Everything above is the part you do; the rest arrives done.